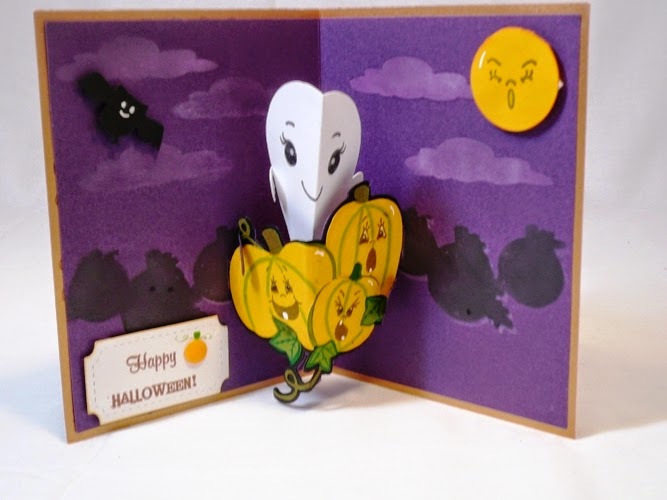
Friday, October 31, 2014

Fantabulous Cricut Challenge Halloween DT Blog Hop


"Happy Halloween"
 and Welcome to "Fantabulous Cricut Challenge Design team card swap Halloween Blog Hop" 
 That is a mouthful isn't it? Not everyone on the team swapped cards, but those of us that did decided to do a blog hop sharing our cards with you. The first card is the card we made and the second card is the card we received.  
I used the Mini Monsters Cartridge to create this above shaped card!

I received this very cool card with Matching Envelope from 


Now pleas go to  http://Unikbyyes.blogspot.com and check out her project, there are not many on this hop however, should you get lost please check out the line-up below


1. DIANA L.----------http://dianamlarson.blogspot.com

2. Karla Yungwirth - http://creative-love-affair.blogspot.ca

3.Liz O. -                   http://Unikbyyes.blogspot.com

4.Diana Lynn Martin-http://leeleecarddesigns.blogspot.com

5 Michelle Nutter-     http://justanutterpapercrafter.blogspot.com

6.Avril Tanner--         http://totallyscrapaddicted.blogspot.ca/


Happy Crafting,
post signature


Thursday, October 23, 2014

Crazy Card Party - Halloween!

I have challenged everyone at Crazy Card Party to create a Halloween Project this week!
I made this cute little layout with my niece and nephew!


Monday, October 20, 2014

FCCB #233 - Colours of Fall

Welcome to another Challenge Me Monday...


 Happy Monday and welcome to another Monday challenge!


Challenge #233 Color Challenge

This Weeks Sponsor

 
~This Weeks Challenge~
Color Challenge
Use the colors brown, orange, yellow, red

To qualify for the prize, be sure to use at least 1 Cricut cut on your project and if it's not obvious, let us know what cartridge you used.

Here is my project:

I had a blast with this project!  I  even made some extra leaves for the ground to look like they fell from the Tree!


Stamps are Lawn Fawn, Patterned Paper is Simple Stories and I used the Tablescapes Fall and Winter to crate the tree and the Simply Charmed for the Leaves!


Sunday, October 19, 2014

Crazy Card Party #37 - Ombre

The Challenge for this week on Crazy Card Party is:
Ombre


When I was at Scrapfest in Richmond Hill I found Journaling card that had an ombre feel to it so I decided to use it for this challenge!

Details:
  1. From White Cardstock at 5 1/4 “ inches cut the Hot Air Balloon 2 times.
  2. Cut the same from the teal patterned paper.
  3. Cut the same from the pink green and orange striped patterned paper and trim the basket off.
  4. Cut the layer from the pink and white polka dot patterned paper.
  5. Using the cuttlebug cut the PTI Cloud Dies from white cardstock and emboss them using the chevron embossing folder.
  6. Create a card base from the white cardstock cut balloons and then layer the rest of the piece.
  7. Tie the ribbon around the base of the balloon. Add sentiment and button.
  8. Add the clouds using pop dots.


Supplies:
Patterned Paper :  Echo Park – Little Girl
Cardstock:  Bazzill (White)
InK:  PTI (True Black)
Stamps:  PTI (Framed out #5)
Ribbon:  Misc
Button:  PTI
Tools:  Cricut Expression, Small talk Frames & Tags – Hot Air Balloon Pg 64
Cuttlebug: Machine & Life style crafts Jubliant embossing folder, PTI Clouds Die

Monday, October 13, 2014

FCCB Challenge #232 - Pun Fun (Nuts about you)


This weeks challenge on the Fantabulous Cricut Challeng Blog is...
Pun Fun!

I made another shaped card for this challenge using the Create A Critter (Acorn) & Mothers Day Bouquet (Leaf) cartridges:


I hope you can play along with us this week at the Challenge Blog!

Details:
  1. Cut the Accessory for the on Page 32 of the Create a Critter Cartridge from White Cardstock 2 times and 1 cut from the Brown Diagnal check patterned paper at 4 ¾”
  2. Cut the top of the acorn using the shift and Accessory features from the Brown woodgrain patterned paper.
  3. Make a card base using the 2 white cuts by scoring the top ¾” of the back cut and gluing the top portion to the top of the scored line.
  4. Ink the edges of the cuts.
  5. Tie some off white ribbon in a bow and attach it near the stem.
  6. Cut a leaf from the green cardstock using the mothers day cricut cartridge  the leaf should be approx 1”.
  7. Stamp sentiment on white cardstock and add with button and twine.


Supplies:
Patterned Paper:  American Crafts – Merrymint (Brown diagonal check), Cosmo Cricket – Nutmeg (Woodgrain)
Cardstock:  Bazzill (White & Green)
Twine:  PTI
Buttons:  PTI
Stamps:  PTI
Ink:  PTI (Dark Chocolate)
Tools:  Cricut Expression, Create a Critter Cartridge (Acorn Pg 32), Mothers Day Bouquet (Leaf)

Friday, October 10, 2014

Crazy Card Party - Chevrons!

The Challenge this week on Crazy Card Party is Chevrons!  I had a blast making this card! I used an embossing folder with chevrons on the diecut clouds!


Details:
  1. From White Cardstock at 5 1/4 “ inches cut the Hot Air Balloon 2 times.
  2. Cut the same from the teal patterned paper.
  3. Cut the same from the pink green and orange striped patterned paper and trim the basket off.
  4. Cut the layer from the pink and white polka dot patterned paper.
  5. Using the cuttlebug cut the PTI Cloud Dies from white cardstock and emboss them using the chevron embossing folder.
  6. Create a card base from the white cardstock cut balloons and then layer the rest of the piece.
  7. Tie the ribbon around the base of the balloon. Add sentiment and button.
  8. Add the clouds using pop dots.


Supplies:
Patterned Paper :  Echo Park – Little Girl
Cardstock:  Bazzill (White)
InK:  PTI (True Black)
Stamps:  PTI (Framed out #5)
Ribbon:  Misc
Button:  PTI
Tools:  Cricut Expression, Small talk Frames & Tags – Hot Air Balloon Pg 64
Cuttlebug: Machine & Life style crafts Jubliant embossing folder, PTI Clouds Die

Monday, October 6, 2014

FCCB Challenge # 231 - Let's Celebrate Birthday (3D Cupcake)


This weeks challenge on the Fantabulous Cricut Challeng Blog is...
Let's Celebrate Birthdays!

I could not resist making another 3D item so I decided to come up with this 3D Cupcake using the Tags, Bags, Boxes and More 2, Ribbons & Rosettes and the Mother's Day Bouquet Cricut Cartridges!


I hope you can play along with us this week at the Challenge Blog!

Details:
  1. I cut the on Pg 35 of the Tags, Bags, Boxes and More 2 Cartridge at 8 ¾” out of the polka dot patterned paper and assembled the box following the directions in the cartridge box.
  2. I cut 7 of the on Pg 21 of the Ribbons & Rosettes Cartridge at 2” and folded them and glued them together.  I then attached them to the cupcake box with glue dots to look like a cupcake wrapper.
  3. Using Cricut Craft Room I used the Digital Cartridge Mothers Day Bouquet to cut The Flower 5 as follows:  cut from patterned paper (yellow) two at 1” one at 1.5” and one at 1.75” and put them together using a pop dot between each layer.  I also cut two of the Leaf2 at 1.5” from Patterned Paper (green) I then glued all the flower pieces to the leaves and attached it to the cupcake.
  4. cut a piece of patterned paper (pink) at 3” x 2” and tape a piece of twine to the centre and roll up the paper to create a candle.
  5. Cut Banner using PTI Die from white cardstock and stamp sentiment in brown ink.
Supplies:
Cricut Expression, Cricut Craftroom, Cartridges:  Tags, Bags, Boxes and More 2, Ribbons & Rosettes, Mothers Day Bouquet.  Patterned Paper:  My Minds Eye – Twinkle Twinkle little girl, Banner Die, Sentiment Stamp and Ink:  PTI. Twine:  Craft supply

Thursday, October 2, 2014

Crazy Card Party - Gold & White

The challenge this week on Crazy Card Party is to use Gold and White!  I had fun making this card this past weekend at Cropfest!


Details:
  1. Ink Edge of white card base with gold ink.
  2. Cut a piece of white carsdtock slightly smaller than the card base and using the cuttlebug machine and an embossing folder emboss the striped lines.
  3. Pop dot this from the card base.
  4. Cut a piece of white cardstock to fit the centre of the Polaroid die cut from fancy pants. 
  5. Stamp the Sentiment with the same gold ink.
  6. Trim the petals from a green flower to create the leaves for the flower. 
  7. Pop dot the frame with the sentiment attached.
  8. Add the flower and leaves and bling.


Supplies:
Die Cut shape :  Fancy Pants
Cardstock:  Bazzill (White)
InK:  Delicata Goden Glitz
Stamps:  Paper Smooches
Green flower:  Maya road
Resin Flower:  Fancy Pants

Cuttlebug: Machine & Embossing Folder:  The Paper Studio (Stripes)