Saturday, October 13, 2012

Fragile - Miss You Card - Creative Paper Trade Challenge Week #2

I decided that since I had some extra time today in my Scraproom I would create a 4th card for this weeks Creative Paper Trade Challenge - I decided to use the free Digi also!


 Here is my Card!

Details:  Creative Paper Trade Free Digi, Stamps:  PTI (Background Basics: Sheet Music & Postmarks) & Paper Smooches (Metropolis), Patterned Paper:  Echo Park (Your's Truly 6x6), Ink:  PTI (True Black & Pure Poppy), Button:  PTI Pure Poppy, Twine:  American Crafts, EKSuccess Border Punch, Cardstock:  PTI (Rustic Cream).


  1. Stamp Rustic Cream cardstock with the Sheet Music Music Background stamp in black ink.
  2. Stamp the Fragile stamp in Black on white cardstock & the Miss You stamp in Red and trim cardstock. 
  3. Cut the pink patterned paper to fit the trimmed sentiments.  Using a border punch punch the top of the pink patterned paper. 
  4. pop dot the digi cut from the centre of the rustic cream card base. 
  5. pop dot the sentiment on an angle.
  6. stamp the airmail arrow in red ink and pop dot from the sentiment. 
  7. Tie the button around a bow made of pink seambinding.

Nutty for You Card - CAS(E) This Sketch #1

There is a new Sketch Challenge Blog that started up this week and I decided to Play along.  The CAS(E) This Sketch! for this week is:


Here is the Card I created! 


Details:  Stamps:  Paper Smooches (Falling For You), Patterned Paper:  American Crafts Amy Tangerine (Ready Set Go), Bella Blvd (Christmas Wishes), Cardstock:  Bazzill & PTI, Ink:  Momento (Rich Cocoa), Twine:  PTI, Copic Marker:  R27, Felt heart.
  1. Stamp the acorn on the back of the patterned papers and cut out.
  2. Layer the pieces to make the acorn
  3. Stamp the Hearts and sentiment in Brown ink on the white cardstock piece.
  4. Colour in the hearts. 
  5. Pop Dot the Acorn from the card and glue the white cardstock to a green card base.

Tuesday, October 9, 2012

The Cameo Spotlight Challenge #5 - Fall Colours

I decided to play along with The Cameo Spotlight Challenge again this week!  It is a colour Challenge using the following colours!

Rich Red • Deep Orange • Harvest Gold


Here is the Card I came up with!

I used a Lori Whitlock Fall Tree Shape found in the Silhouette Store! I wanted a little dimension to the tree leaves so I cut them 2 times and placed the first cut inside the whole of the negative cut on the white cardstock and then scored an additional leaf down the centre before gluing to the centre of the first leaf!


Details: Silhouette Cameo, Lori Whitlock Cut Shape (Tree), Woodgrain Stamp: Hero Arts, Sentiment Stamp: PTI-Fillable Frames #1, Ink: PTI – Dark Chocolate, Patterned Paper: Patterned Paper: Bella Blvd (Finally Fall), Ribbon: PTI, Button: Jenni Bowlin, Twine: American Crafts


  1. Cut the Tree on White Cardstock
  2. Cut the leaves in 2 different patterned papers
  3. Place a piece of cardstock behind the white cut tree and attach first layer of leaves.
  4. Using a scoring blade score the 2nd Layer of leaves before glueing to give a little dimension
  5. Tie Ribbon around the white cardstock piece and tie twine through button then tie in a bow.
  6. Pop Dot the white piece to a craft cardstock base.

Sunday, October 7, 2012

Creative Paper Trade - Paper Nudge #2 Challenge - Sketch

I wanted to complete all three challenges again at the Creative Paper Trade!  This card is for the Paper Nudge #2 Challenge - A Sketch! 


Here is the Card I made!  I had a lot of fun with this Challenge!  And even used some Old Chatterbox Paper!  I used some Digital's from the Creative Paper Trail Esty Shop!  I used the Notes:  Journal Tag and I stamped a sentiment onto it and I used a round Digital as well! 


I created a little dimension with a lot of pop dots and some additional prints of the Circle 


Details:  Digitals(Creative Paper Trail Etsy Shop), Patterned Paper:  Chatterbox (Scrapbook Walls – Garden Pebbles),  Bella Blvd (Christmas Wishes – Christmas Love),  Stamps:  PTI – Love Songs, Ink:  PTI True Black & Pure Poppy, Ribbon:  Blue Seambinding, Button:  PTI – Hibicus Burst,  Dies:  PTI (Journal Tabs, Doily Details), Twine:  American Crafts, Sewing Machine, Punch:  Split Punch (Stampin Up), Cuttlebug, Fabric Brad:  Spare parst from the Paper Studio.
  1. Sew it in place. 
  2. Print & Cut the Digitals from Creative Paper Trail.  
  3. Stamp the sentiment P.S. I love you on the tag.
  4. Using the Split punch punch a strip of the Heart patterned paper.
  5. Pop dot from the Notes tag.
  6. Cut the doily die and the journal tab with the Cuttlebug Machine.
  7. Pop dot the circle digital from the doily die and trim the heart from another of the round digital.
  8. Fold the heart in half and glue the centre of the heart to the heart on the circle cut.
  9. Using the Brad make a bow from the ribbon.
  10. Pop Dot the round digital on the journal tag.
  11. Tie some twine through the button and glue to the centre of the round part on the digital journal tag.
  12. Stamp the journal tab with the heart in red and the xo’s in black. And glue to the diginal journal tag.


Saturday, October 6, 2012

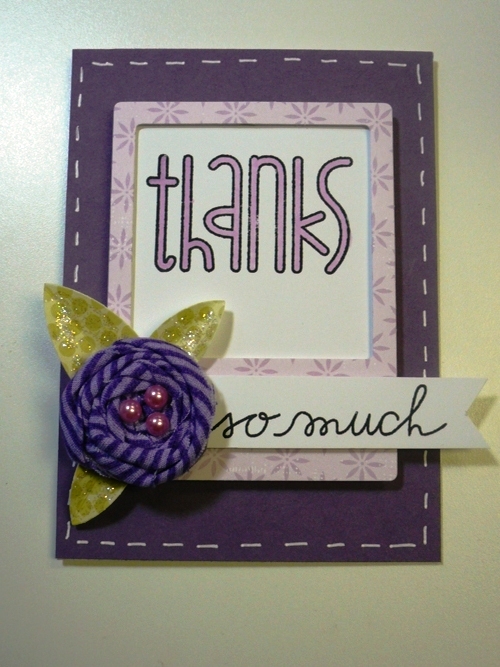
Creative Paper Trade - Colour My Week #2 Challenge

The Creative Paper Trade Colour My Week Challenge #2 is Purples and Pinks!

Here is my card!  I even made a fabric flower!


Details:  PTI - Dies (Frame & Leaves), Stamps:  Paper Smooches (Sentiments), Fabric, Bling:  Pebbles, Ranger Stickles, Cardstock & Patterned paper: PTI.

Creative Paper Trade - Tip Top Shape #2 - Triangles

The Creative Paper Trade Shape Challenge for this week is Triangles!  

Here is what I came up with!   The cone shape is a triangle!  


Details:  Silhouette Cameo, 2 Silhouette Cuts from Lori Whitlock, Patterned papers:  Maggie Collection by Lori Whitlock. Bazzill cardstock (white & kraft), Glitter, Glossy Accents, Ribbon, Pearl, Stamp & Ink:  PTI.

  1. Open the Ice cream cone and weld the top to the bottom of the cone. 
  2. Cut 2 from White Cardstock. 
  3. Cut the Top from the Pink with White Polka dot Patterned Paper. 
  4. Cut the 2 base cone parts from kraft cardstock. 
  5. Ink the top base cut with Dark Brown ink and glue to the craft triangle piece. 
  6. make a card base from the 2 white cuts that were welded.
  7. Pop dot the pink top of the cone from the base. 
  8. Tie the ribbon in  bow.
  9. Using glossy Accents apply glitter to the 3 flower pieces that were cut from the yellow patterned paper.
  10. Pop dot each layer to give some dimension and add the yellow pearl to the centre of the flower.  
  11. Stamp sentiment and trim, then glue to the card.

Monday, September 24, 2012

Creative Paper Trade - Tip Top # 1 Challenge

So I have totally been enjoying the 3 challenges that were issued at the Creative Paper Trade last week and thought I would complete all 3 of the challenges - this is the 3rd one and we were to use Squares!  So I immediately thought to use the free digi shape that they issued during the week!  Here is my submission for the Challenge!


I wanted to give a little dimension to the original digi so I printed it a number of times so I could raise the frame and add a second apple and leaf!


Details:  Creative Paper Trade-Week 1 Digi (Thanks), Patterned Paper:  Jillibean Blossom Soup (Red & White Polka Dot), Lined Paper (misc), Kraft Cardstock:  Bazzill, Twine & Ribbon:  PTI, Stickles, White Gel Pen 
  1. Print 3 copies of the Free Thanks Digi.
  2. Trim the centre out of the first one leaving only the Yellow Frame.
  3. Out of the Centre piece trim the apple shape.
  4. Trim only the green leaf from the 2nd printed digi.
  5. Then pop dot the yellow frame from the remaining printed digi.
  6. Score the centre of the cut apple and glue on top of the centre of the full printed digi.
  7. Score the Leaf cut in the centre and glue the folded part to the green leaf.
  8. Tie the Twine around the Apple stem
  9. Add Green Stickles to the leaf and set aside to dry.
  10. Cut a kraft card base.
  11. Cut the Rulled paper to fit in the card front and glue to the base of the card.
  12. Cut a banner shape from the Red and White polka dot patterned paper and glue to the centre of the card front.
  13. Attach a piece of yellow ribbon to the bottom of the digi cut once it is try and then pop dot off the centre of the top portion of the card.
  14. Round the 2 Bottom corners.
  15. Using the White Gel pen add the faux stitching lines.