Tuesday, April 24, 2012

Beach Bucket! - Weekly Cricut Challenge

So I thought maybe I might still need some more weight to ensure that our umbrella did not fall so I made this cute little little beach bucket and filled it with some sand and some starfish!  This was also created for the Cricut Weekly Challenge which was to use primary colour and chalk on diecuts.  Here I used a little chalk on both the sun and the waves.


So I thought I would actually add some sand the to the sandcastle die cut so I stuck it through my xyron sticker maker and then sprinked some of the sand on top to make it actually look like some sand!


I could not resist making a little tag for the handle!   I used some brown chalk on the sun.


Plastic Beach Bucket Instructions:


Yellow Bucket - Dollarstore, Cricut Expression, Life’s A Beach Cricut Cartridge (Castle Pg 61 & Waves Pg 45 & Title Beach) and Pack your Bags Cricut Catridge (Sun) . Kraft Cardstock, Sand, Patterned Paper: Little Yellow Bicycle (Winter Twig) Blue, TCP Studios (Summertime Relaxin’) Red/Pink & Green/Yellow. Die: PTI – Tag Sale 3 (Tag), PTI Ink: Dark Chocolate; yellow stickles; Pink Cosmo Cricket Letter Stickers.

  1. Cut at 3 ¼” from Page 61 of the Life’s A Beach Cricut Cartridge from Kraft cardstock.
  2. Run the sandcastle through the Xyron Sticker maker so the cut is sticky on the front and sprinkle cut with sand.
  3. Hand cut some flags and attach toothpicks to them and glue them to the back of the castle.
  4. Cut 2 of the using the Border feature at 1 ¼” from Blue Patterned Paper.
  5. Cut Tag from Green Patterned Paper
  6. Cut a piece of kraft cardstock to fit the inside of the tag and ink it with Brown Ink.
  7. Cut the title Beach from Pg 78 at 1 ¾ from Yellow cardstock and trim away the pelican
  8. Cut 2 of the from pg 28 of Pack your Bags cartridge from Yellow patterned paper and trim the circle from one.
  9. Place title and sun and tick on tag and use stickles on the word beach

Monday, April 23, 2012

Fish Bowl Centrepiece & Cricut Monthly Challenge

So while I was on a vinyl cutting craze, I need some weight to keep the umbrell stand in place so I created a little fish bowl to sit in the centre of the table!  It just so happens that this also coninsides with the Cricut Circle Monthly Challenge to make a centre piece!


Fish Bowl Centre Piece Instructions:


Circut Expression, Life is a Beach cartridge and layers from page, Luau Cartridge (Fish)

  1. Cut the at 5” from Dark Pink Vinyl and stop the cutting after the fish is cut.
  2. Cut the Layers for the fish from light pink Vinyl
  3. Cut the again at 5” from the Blue Vinyl and stop the cutting after the fish is cut.
  4. Cut the layers for the fish using the Dark Pink Viynl
  5. Apply the fish to the side of the Vase.
  6. Cut the fish from the Luau cartridge in flip mode at 4 ½ from light pink vinyl and yellow cardstock. Glue the yellow cardstock cut to the light pink vinyl piece.
  7. Cut the layer for the fish at the same size from green vinyl
  8. Apply green layers of vinyl to yellow cut fish and then attach to vase.
  9. Apply yellow stickles to the yellow layers remaining.
  10. Add Blue stickles dots to the blue fish
  11. Add pink markings to pink fish with fruit punch stickles

Sunday, April 22, 2012

Matching Cupcake Stand!

Ok so Teri told me that she wanted to make some cupcakes for the table and wanted to have them displayed nicely... while I looked around for a cute cupcake stand but nothing seemed to look like it would suit the theme so I found these 2 diferent sized mating plates at the dollarstore and a wooden candlestick I had laying around the house and came up with this!


Here is a picture of the items I used....


Here is how it turned out - I just used the same cuts as the Tumbler but made the ones on the bottom plate a little smaller.


Of course... I also had to create some little cupcake toppers to match so I used a PTI Stamp sent and some tulle to create these! 

Saturday, April 21, 2012

Matching Bucket!

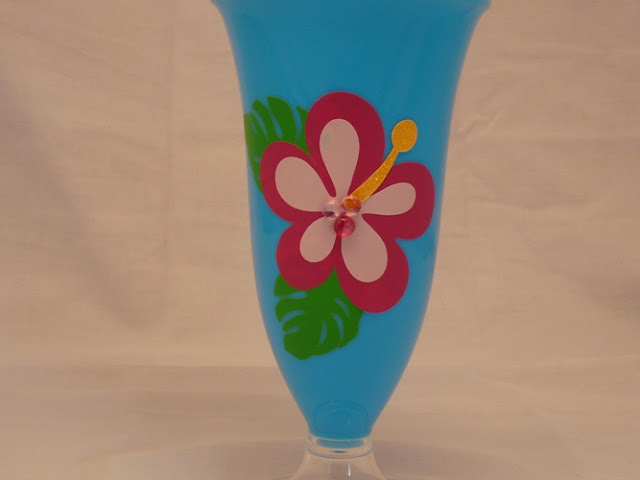
I also found this cool bucket to match the tumblers and decided it would be a great centrepiece for the table to house some cool Tropical Drinks in...  This is how it turned out!


Tropic Punch Bucket Instructions:


Blue Bucket – Dollar Store; Vinyl: Dark Pink, Light Pink, Green; Bling: The Robbins Nest (orchid); Cricut Expression; Life’s a Beach Cartridge (Flower & Leaves & Title), Yellow Stickles.

  1. Cut “Tropic Punch” from the Life’s a Beach Cartridge Pg 36 with the Title Words feature at 4” from the Dark Pink Vinyl and trim away the flower before applying to the bucket.
  2. Cut the flower from the same cartridge Pg 34 at 21/4” from dark pink vinyl and then cut the layers from light pink vinyl and yellow cardstock. Apply the light pink flower centre layer to the dark pink flower cut.
  3. Make the yellow cut into a sticker using the xyron sticker maker and apply to centre of the vinyl cut flower.
  4. Cut 2 of the leaf from page 37 at 1 ½” from green vinyl.
  5. Apply the whole flower and leaves to the bucket.
  6. Add bling to the centre of the flower. And apply yellow stickes to the yellow flower piece.

Friday, April 20, 2012

A little Vinyl Cutting on the Cricut!

Ok - so like most of you I was very skeptical about trying to cut some Viynl on my Cricut machine! I have had a number of rolls stashed away in a cupboard for about 2 years now...Well I found this great little youtube video online and let me tell you... I have no idea why I never tried it before - I just followed the directions in the video and it was so simple!!!


So as part of the table decor for Scrapfest I wanted to add a little viynl flower to some tumblers, plates and a bucket I found at the Dollarstore! 

So here is what I basically started out with for the tumblers!

Some Pink and Green Vinyl and since I did not have any yellow vinyl I just used some yellow cardstock, the Life's a Beach Cricut Cartridge and some Yellow Stikles to add a little Bling!  So here is the finished product!


As you can see I needed 7 glasses in total!

I also made my Drink Umbrella's to match using a Scalloped Circle cut that came with my Cricut Expression 2 machine. 


Blue Luau Glasses Instructions:


Tip: You can place these cuts by hand without the transfer tape but it is easier if you layer the inner pink layer on the vinyl before placing it on your cup
  1. Green Vinyl Leaf is cut at 1 ½” from Page 37 of Life is a Beach Cartridge, you will need 2 for each glass.
  2. Cut Pink Flower from Dark Pink Vinyl at 2 ¾” from Pg 34 at of Life is a Beach Cartridge, you will need 1 for each glass
  3. Cut the Flower layer in light pink vinyl using the Layer feature at the same size from Pg 34 of the Life is a Beach Cartridge.
  4. Place the light pink flower layer on top of the dark pink flower before placing on cups.
  5. Put the leaves on the cups first then the flower.
  6. Cut the Flower layer again in Yellow Cardstock at the same size for the center of the flower.
  7. Using a zyron sticker maker place the yellow centre cut on the flower.
  8. Apply yellow stickles to yellow centre cut and allow to dry.

 
Drink Umbrella Instructions:


Cricut Expression 2, Cricut American Alphabet (Pg 65 ), Patterned Papers: TPC Studios - Summertime Relaxin’ (Yellow Dot and Pink Dot), TPC Studios – Summertime Ticket to Ride (Green & Yellow Dot), Little Yellow Bicycle – Winter Twig-Winter Fresh Pom Pom (Blue dot)

  1. Cut the scalloped circle using the blackout feature at 4.5” out
  2. Cut 8 all together 2 out of each patterned paper.
  3. Score in between each petal of the flower cut.
  4. Trim away one petal leaving a flap to be used to attach to the other petal to create umbrella shape.
  5. Fold each petal along the score and glue the flap to the other petal.
  6. Glue Wooden skewer to the centre of the inside of the umbrella

Come back tomorrow and I will show you how I created a 2 Tierd plate tray to use as a cupcake stand as well as a bucket to house some some drinks with ice that match the tumblers!

Thursday, April 19, 2012

3D Pumpkin

Here is the last Item I created while at the Scrapfest Crop.
I used the Christmas ornament from the Tags Bags Boxes and More 2 Cartridge to create this little pupkin.


Details:  Cricut Expression, Tags, Bags, Boxes & More 2 Cartridge, Flower shop Cartridge (Leaf),Bazzill Cardstock (Orange & Brown) Patterned Paper:  Simple Stories Yearography, Bo Bunny Double Dot (Wasabi), Seam Binding:  Brown, Sentiment is from the We R Memory Keepers line.

1.  Cut the ornament from the Cartridge at the suggested size from both white cardstock and orange.
2.  on the white cut remove one of the oval shapes to use as a template for the patterned paper.  Trace it onto another piece of scrap cardstock andding about an extra 1/4" to each end tab and cut to use as a template for the patterned paper.
3.  Using the template trace enough of the shapes from the patterned paper to cover all sides of the ornament.
4.  Ink all edges of the patterned paper.
5.  Glue the ornament together following the directions and adding a strip of the brown cardstock or the top of the pupkin.
6.  Add the patterned pieces enuring that there is a little space between the orginal base and the layer.  you will only need to glue the tabs to the orange ornament shape.
7.  Add the cut leaf and the Button Twine and vines.

Supplies Used:


Wednesday, April 18, 2012

Nuts About You Card

I also made this little Acorn Card while at the Scrapfest Crop.


Details: Cricut Expression, Create a Critter Catridge, Patterned Paper:  American Crafts (MerryMint) & Cosmo Cricut (Nutmeg) Seam binding, Button, Twine, Ink and Sentiment is from PTI.  Glossy Accents and Glitter.

Supplies Used:


Tuesday, April 17, 2012

I Go Nuts for You! - Basket with Acorns in it!

One of the items I made while at the crop at Scrapfest is a Basket with little 3D Acorns in it.  Here is a picture of how it turned out!


Here is a close up of one of the little Acorns!


The Acorn is made using the Flower Shop Cartridge and the Basket is from the Sweet Tooth Boxes Cartridge! 

Details:  Cricut Expression, Cricut Craftroom, Flower Shop Cartridge (Acorn), Sweet Tooth Boxes (Basket) Cartridge, Patterned Paper:  We R Memory Keepers & SEI, PTI:  Button & Twine, Glitter, Glossy Accents, Tiny Attacher.

1. Cut the 6 petal  Flowers  with the width at 3.4" using Cricut Craftroom, you will need 6 in total.
2.  Score in between each petal and remove one of the petals insuring to leave a little piece of the removed petal to use as a tab.  Then fold where the score lines are and glue the small tab to the petal that is closest to it.
3.  Using a hole punch punch a small circle at the top of each tab to ensure that you can run ribbon through it to close up the petals to create the base of the Acorn. (I used Cricut Craftroom and a circle that I found from inside another flower so that it cut on the cricut.
4.  Cut the scalloped circular top  and remove 6 scallops of the circle leaving a small portion to use as a tab.
5.  Glue the tab to the edge of the other cut portion.
6.   Fill each piece of the flower with a small penut butter cup and close up the flower with the brown ribbon.
7.  Pull the remaining ribbon throught the scalloped circular part.
8.  Cut the leaves at 1.4" width using cricut craftroom and add glossy accents and glitter to each leaf.
9.  Tie Twine around the ribbon, tie in a knot and then through the leaf and button then tie in a bow.
10.  Cut the Icecream cone basket at the suggested size from brown Cardstock and score the scalloped area at the top before following the instructions to put the basket together. 
11.  Take the plaid patterned paper from the We R Memory Keepers paper pack and create a ruffled border using the tiny attacher stapler.  Add the green ruffled trim to the top. 
12.  Using a dowel add the sticker pieces from the We R Memory Keepers paper pack to the dowel and add some tulle to the dowel as well.
13.  Fill the basket with some kraft coloured basket fill.
14.  Add the acorns and the dowel to the centre of the basket.

Supplies Used


Monday, April 16, 2012

Scrapfest Kitchener 2012! - I had a blast with all my Scraping Buddies!

Well I attended yet another great Scrapfest Event on the weekend with my "Srapping Buddies"  Every year they run a show us your creativity contest and this years topic was "The Topic is Tropic"  well this theme was right down my ally and I got straight to work on some cool decorations for our table!  Here is the table set up in my living room so I could see how things were turning out as I created! 


Here is a picture of our table at Scrapfest set up before any of us took out our Scrappy Supplies!


They always run fashion show too so how could Terry, Sharon and I resist making these little bikini outfits for us all!  


Teri even made cupcakes so I came up with this little cupcake stand for us by painting a wooden candlestick and using 2 dollar store plates... I added a little cut viynal on the plates and made some cupcake toppers to match the theme as well!

Later in the week I will show you how I created each item that we had at the tables including these cool little 3D Pinapple Drinks we bribed the judges with!


The best part is - WE WON FIRST PRIZE!!! for the Show us your Creativity Contest!  And totally had a blast at the event!

Wednesday, April 11, 2012

Cricut Circle Weekly Challenge #55 - Springtime!

The weekly challenge this week on the Cricut is to create a Springtime project - you must use rickrack and a sticker on your project as well. 

I made this little carrot card with the Create a Critter Cricut catridge!


Details:  Cricut Expression, Create a Critter Cartridge, Cardstock:  Bazzill, Patterned Paper:  We R Memory Keepers (Cotton Tail - Thicket), Simple Stories (Year-o-graphy - Orange Grid), Ranger:  Stickles (Star Dust), Ribbon:  Seambinding, RickRack (Basic Basic from Michaels), Button:  PTI (White & Cream Mix), Bling:  Dollarama  Sicker:  Simple Stories (Fabulous)

Cut the on Page 26 at 4 3/4" you will need 2 from white cardstock, one from green and one from orange patterned papers.  trim the leaf portion off of the orange cut.
Cut the Layer 2 feature from Green Patterned Paper using your siccors, cut this into 3 seperate leaves and fold down the centre and glue to first green cut to provide some dimension.
Create a card base from the 2 white carrot cuts.
Glue all piecesof the carrot together.
Tie the Seam binding around the neck of the carrot and then tie a bow.
Tie a piece of green rick rack into a bow and attach a button to it.  Then glue to the centre of the white bow.
Add some bling to the centre of the button.
Place sticker on card.
Add stickles to leaf portion.

Tuesday, April 10, 2012

Circut Circle - April 2012 Magazine Challenge

The April 2012 Magazine Challenge on the Cricut Circle Blog is to use the Cricut Cartridge Letter Envy to create a project.  I decided to make one of the crests on the cartridge look like a jean pocket.  Here is my project:


Details are as follows:

Cricut Expression, Letter Envy Cricut Cartridge, PP: Pink Paslee – Indigo Blue (Jacquard), My Mind’s Eye Dilly Dally “Hello” Flannel Paper (Red), Bo Bunny Double Dot Wasabi Stripe (Green) Ranger Ink: Tim Holtz Distress Ink (Faded Jeans), PTI Ink - Dark Chocolate & Pure Poppy, Blue Ink pen, Kaisercraft Tiny Alpha Stickers (Raspberry) Sentiment Stamp: PTI – Tag it’s #3. Glossy Accents & Palette Glitter, Spray Glue, Buttons: PTI (White & Cream Mix).

1. Cut the Crest found on Page 60 from White Cardstock at 4 ¼” 2 times.
2. Cut the Crest from the Blue Patterned Paper
3. Cut the Crest with shift key from Blue PP and Red PP
4. Cut the Crest Layer feature from both Green pp and Red pp and Blue Cardstock.
5. Cut the Sun from Page 72 of the Country Life Cricut Catridge at 3” from Yellow Patterned paper and trim away the hill portion before gluing to pocket.
6. Trim away leaves on Red cut.
7. Ink Blue Pieces with Distress ink (Faded Jeans)Glue pieces together.
8. Ink the sun lightly in brown ink before gluing to pocket
9. Create a card base using the 2 white cuts
10. Glue Blue Jean Pocket to Card Base.
11. Using a Blue Pen make
12. Spray white button with spray glue and sprink with glitter.
13. Tie some twine around the button and glue to centre of flower.
14. Add some glitter with the glossy accents to the rays on the sun.
15. Stamp sentiment and apply letter stickers.