Monday, August 27, 2012

Published Altered Item - Cricut I.B - Quick & Easy April/May 2012

The following Birthday Wishes 3D cake Box was recenlty pulbished in the Cricut Idea Book - Quick and Easy in April/May 2012!

Birthday Wishes - Page 98 & 99

Birthday Wishes Cake Box:  Patterned Paper:  Echo Park - Sweet Summertime, Ribbon Stamps & Ink:  PTI, Cricut Expression, Cricut Cartridge:  Tags, Bags, Boxes & More, EK Success Border Punch.
  1. Using the 12 x 12 Cricut Mat cut the on Page 126 of the Tags Bags Boxes and More Cricut cartridge using the Fit to page feature to fill the full piece of blue cardstock.
  2. Cut the same in white cardstock.
  3. Cut the White cardstock cut piece where the Score lines are and trim around 1/8” from all sides to create templates to use for your patterned Paper.
  4. Score the Blue cardstock cut using the score lines and fold and put together the cake box base.  
  5. Using the white pieces as templates cut the sides of the cake in the striped pp
  6. Using the triangle white piece cut the flowered pp
  7. glue to cut pieces to the cake box
  8. Before attaching the back of the cake with the patterned paper cut a 2 inch strip of yellow pp and use a Ek Success Punch to create a scalloped edge – score just below the punched edge and glue to the cake box at the top back.
  9. Punch a tag with the Marvey Punch and stamp sentiment on tag in Black Ink.
  10. Tie ribbon through the tag and around the box flap before sealing the back of the cake box.
  11. Hand cut small blue flowers from pp and pop dot them off the top.  Glue blue bling to the centre of the flower.


Sunday, August 26, 2012

The Cameo Spotlight Challenge #2 - Numbers


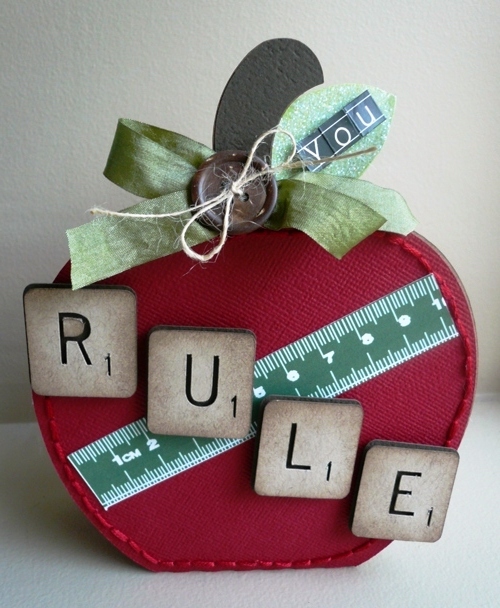
The Challenge this week on The Cameo Spotlight is to use Numbers on your project.  I used 3 silhouette shapes to create this little apple basket.  Numbers are inlcluded  on the print and cut ruler shape and the Scrabble Tiles.  


It is a little apple shaped basket that could hold a few goodies!


Details:  Silhouette Cameo, Bazzill Cardstock (Green, Brown, Kraft, Red, White), Button, Ink & Twine: PTI, Glossy Accents, DecoArt Glamour Dust, Jenni Bowlin Studio Stickers (You), Needle, Embroidery Floss, Ribbon: May Arts 

 The following Silhouette Cuts: 3D Apple Basket, Scrabble Tiles,   Ruler Borders – Bright (P) 

 Step by Step Instructions:  

  1. Cut the 3D Apple Basket from Red and Kraft Cardstock at 11.240 wide and 8.855 high. 
  2. Cut only the stems from Brown cardstock. 
  3. Trim off the sides & Stems of the basket on the red cut apple basket. 
  4. Hand stitch using Red Embroidery Floss around the apple body. 
  5. Print & cut the Ruler Borders, Use the Green cut (Size: 4.25 Wide) 
  6. Cut the Scrabble Tiles at the standard size from Kraft and Brown cardstock 
  7. Ink the Scrabble Tiles and the Kraft Basket with Brown Ink. 
  8. Using pop dots pop dot the craft piece over the brown piece. 
  9. Glue the Brown stems to the kraft basket 
  10. Form the basket and glue the red apple on to the kraft basket. 
  11. Glue the Ruler and the scrabble tiles to the front of the apple basket. 
  12. Tie ribbon around the stem of the apple 
  13. Tie Twine through button and attach in the centre of the bow. 
  14. Hand cut a leaf, cover it in glossy accents and glamour dust glitter. 
  15. Once leaf is dry using pop dots pop dot the letter stickers to spell You on the leaf and add to the basket.

Saturday, August 25, 2012

Published Card - April 2012 Cricut Magazine

The following card was published in the April 2012 Cricut Magazine!

Just Hatched - Page 73

Just Hatched:  Patterned Paper:  Best Creations, Ribbon:  May Arts, Stamps & Ink:  PTI, Cricut Expression, Cricut Cartridge:  Simply Charmed.

  1. Using the Simply Charmed Cricut Cartridge cut 2 of the found on Page 35 at 4 ½” in white cardstock.
  2. Cut the same in Yellow Cardstock.
  3. Using the Layer 2 and shift button cut the egg shell in the Blue Patterned Paper.
  4. Using the Layer 3 and shift button cut the birds beak in orange cardstock.
  5. Score one of the white cardstock shapes at ¾” and glue the top portion of the white cut to the second white card cut.
  6. Glue the Yellow cut on top of the white cardstock card base, making sure to tape down the Yarn pieces before gluing
  7. Pop Dot the Patterned egg shell on top of the Yellow card base.
  8. Glue the orange Bird Beak
  9. Apply the Black pearls as eyes
  10. Stamp sentiment in black ink on white cardstock and trim around the sentiment.
  11. Glue sentiment on card
  12. Tie a bow and attach it on the corner of the sentiment using a glue dot


Thursday, August 23, 2012

3D Carousel with Echo Park "So Happy Together"

I made this cute little 3D Carousel with my Silhouette Cameo I am submitting it for both the Echo Park "So Happy Together Challenge and the Cameo Spotlight Challenge for this week!


Details: 3D Carousel
Silhouette Cameo, 3D Carousel cut shape from the Silhouette Onine Store, Echo Park "So Happy Together", My Favorite Things Die & Stamp (Ticket), PTI Ink.  Ribbon from my stash, Bling, Dollarama, Fabric Covered Brad (the paper studio).


  1. Cut the silhoutte shape from both blue cardstock and the different patterned piece. 
  2. I cut 2 of each of the horse shapes (one fliped) so you can see the pattern on both sides. 
  3. I added 2 different border stripes to the base of the carousel, and some bling around the top. 
  4. using a toothpick I attached a bow, the ticket and the fabric brad.
  5. I then handcut the clouds and sun and glued them to the top of the toothpick.
  6. I also added some black rhinestoes to the horses for their eyes.

Wednesday, August 22, 2012

Published Layouts - Cricut Idea Book Feb/Mar 2012 Families

I recently had 3 Layouts published in the Cricut Idea Book - Family's that was recently issued in February/March of 2012.  

 
Splish Splash - Page 74 & 75

Tea Party - Page 84 & 85

We Are Family - Page 90 & 91

Splish Splash:  Patterned Paper:  Echo Park - Sweet Summertime, Craft Felt, Floss, Stickles, Punches:  Ek Success Treading Water, Cricut Expression, Cricut Cartridge:  H20 (Title & Beach Ball), Simply Charmed, Leaves for flower, Cuttlebug, Flower Dies (Cuttlebug), Sewing Machine.

  1.  To create Beach Ball feltie cut the Ball and layer in white cardstock at 1 ¾” Glue the white cardstock circle to the blue felt and the layer cardstock to the orange felt and hand cut around the shape.  Glue the orange piece to the blue circle.  Glue an orange button to the centre top of the ball and add  a green coloured pearl to the centre of the button.
  2. Create 3 leaves for the flower by using the layer 3 with the Real Dial Size Button turned on at 1” in white cardstock.  Glue the White cardstock to the green felt and hand cut each of the 3 leaves out.  Hand stitch down the centre of each of the 3 leaves using green embroidery floss.  Cut an Orange Flower and a Blue flower out of felt using a Cuttlebug and the Flower cuttlebug dies  Glue the flowers and the leaves together to create the flower feltie and add a green button to the centre.
  3. Handraw gridline with pencil on white cardstock insuring that there are 6 rectangles approx 3 ½” wide by 4 ¾” long.  With Orange Thread in the sewing machine sew over hand drawn gridlines and erase any remaining pencil markings. 
  4. Cut 3 pieces of the Blue pp to 4 ¾” x  3 6/16” and glue to the appropriate markings on the grideline. 
  5. Cut the 3 photos to the same size of the patterned paper and glue to remaining squares of the gridline.
  6. Cut the Echo park Die cut shape from the pp and glue in the first square and write the journaling.
  7. Attach the Flower Feltie that was created earlier.
  8. cut 3 7” strips of blue cardstock and trim the long edge with the EK Success treading water punch to create the waves.  Using Blue Stickles cover the bottom and top of the strips of waves.  Pop dot the 3 layers of waves on the layout in the bottom right corner to give dimension.  Add the Beach Ball Feltie created earlier.
  9. Hand cut 8 circles from the pp and trim off the bottom edge of each circle.  Glue to the top left of the layout.
  10. Using the H2O Cricut Cartridge cut the phrase Splish Splash in both green cardstock and blue cardstock at 3 ¾”  Trim the water spash marks off of the green cut and glue the green to the blue.  Pop dot title off the page and add green stickles to the green portion of the title.  Then add glossy accents to the blue water spash marks to make it look more like water.  


Tea Party:  Patterned Paper & Diecuts:  Kaiser Craft (Candy lane), Cricut Expression, Cricut Cartridges:  Cricut Cake-Birthday cakes (title), Circle Punch - EK Success, Ribbon:  May Arts. from the Pink Dot pp cut a 10 1/2” x 10 ½” square.
  1. Using the Circle Punch cut 8 circles from the stripped pp.
  2. Glue circles to the back of the pink square making sure to overlap them a bit to create a scalloped edge.
  3. Glue the pink square 10 ½” Square to the Orange PP
  4. Create a flower using the Green dot with Pink scalloped circle die cut and attaching the orange felt flower to he centre.  Then attach the chipboard flower to the centre of the orange felt flower.
  5. Attach all 3 photos and then glue down flower in bottom left corner of the photo making sure to overlap a part of the flower on the photo.
  6. Hand cut the banner from the pp and pop dot it from the layout over the top left photo.
  7. Make 2 bows using the ribbon and attach on either side of the banner
  8. Using the Cricut Cake – Birthday Cakes Cricut cartridge cut the word Tea Part in the green pp at 3 ¼” using the Plain Phrase feature and the double hearts.
  9.  Cut the layer Party in orange using the shift key along with the Plain Phrase Feature.
  10. Glue the Orange word “Party” to the Green cut phrase.
  11. Pop Dot the Tea Party Title on the layout
  12. Glue the Tea pot Chipboard shape just above the word on a slight slant.of the strips of waves.  Pop dot the 3 layers of waves on the layout in the bottom right corner to give dimension.  Add the Beach Ball Feltie created earlier.
  13. Hand cut 8 circles from the pp and trim off the bottom edge of each circle.  Glue to the top left of the layout.
  14. Using the H2O Cricut Cartridge cut the phrase Splish Splash in both green cardstock and blue cardstock at 3 ¾”  Trim the water spash marks off of the green cut and glue the green to the blue.  Pop dot title off the page and add green stickles to the green portion of the title.  Then add glossy accents to the blue water spash marks to make it look more like water.  
We Are Family:  Patterned Paper:  SEI (Addison) & Bella Blvd (Family Tree), Ribbon:  American Crafts, Fun Foam, Chipboard: Making Memories, Corner Rounder:  EK Success, Martha Stewart Fringe Siccors, Cricut Expression, Cricut Cartridge:  Seranade (tree), Cuttlebug, Cuttlebug Letters, Quickutz Cloud Die, Spellbinder (Butterfly), 
  1. Cut Blue PP to 4 ½” x 12” inches and trim one 12” edge with the Cutter Bee Paper Trimmer using the Scallop Blade.
  2. Cut the Orange PP to 6” x 5 1/4”
  3. Cut the Striped PP to 1” x 12”
  4. Cut the Green PP to 1¾” x 12” and trim one 12” edge with the Cutter Bee Paper Trimmer using the Scallop Blade.
  5. Cut the Blue PP first to the Brown Cardstock, then the Orange pp
  6. Hand cut 3 pieces of Green PP to create the hills for the tree.  Using the Martha Stewart Fringe Sissors create a grass look to 2 of the hills.  Place one of the hills overlapping the orange cardstock.
  7. Cut the Tree on the Cricut using the Green Bling Cardstock at 7”
  8. Cut the Tree trunk using the Layer Feature in Brown Cardstock at 7”  and glue the trunk on top of the green tree.
  9. Glue the tree to the layout on top of the hill
  10. Add the other 2 layers of the hill
  11. Cut a 2” x 1” strip of beige cardstock and using the corner round round the 2 edges.  Using a green gel pen write the date of the picture and place over the final hill
  12. Attach photo making sure the tree leaves overlap the photo a little
  13. Glue down the stripped pp and the green pp with the scallop edge trim
  14. Glue the ribbon to the layout over the striped pp.
  15. Glue the Making Memories word Family above the phot
  16. Cut 2 clouds using the Quickutz Die from white craft felt
  17. Cut the letters for the rest of the Title “We Are” using the Cuttlebug dies from Black Fun Foam)
  18. Glue the clouds to the layout and glue the Letters to the Clouds
  19. Using the small butterfly from the Spellbinder die set cut one brown butterfly from craft felt.
  20. Glue the felt butterfly to the letter Y on the word Family. 
  21. Glue the 3 pink bling hearts to the centre of the butterfly. 


Monday, August 20, 2012

Published Card - Cricut Magazine March 2012

Here is a card I had published in the March 2012 Cricut Magazine, Page 21


Details:  Cricut Expression, Cricut Cartridge:  Simply Charmed Pg 55, Stamps, Twine & Ink:  PTI, Kaiser Craft Pearls, Patterned Paper:  Crate (Restoration), Pink Paislee (Picket Fence)

Tree is cut at 5"


Sunday, August 19, 2012

Card - You Are So Sweet!

Ok - so I have spent all week in my scraproom organizing and purging stuff and I have so had my creative juices flowing seeing all that I have in my room!  So today - i just could not wait to spend an hour creating this quick card!  I just had to play with my new American Crafts Neapolitan Paper Pad I picked up at Homesense a while ago!


Details: Patterned paper American Crafts Dear Lizzy Neapolitan, Stamp: American Crafts Dear Lizzy, Ink: PTI (True Black), Word Stickers: My Mind’s Eye –The Sweetest st Thing (Lavender), Twine: American Crafts, Doily (misc), Glimmer Mist (Sun Sisters), Wood Heart: Studio Calico, Ribbon (Seam Binding), Bling – Crafts (Dollarama), White Gel Pen: Uniball Signo. 


  1. Hand cut the Jar from the patterned Paper. 
  2.  Stamp Sentiment in Black ink and add Word Stickers 
  3. Tie Pink Twine around the jar top 
  4. Glue Wood Heart and Bling in place. 
  5. Mist Doily (let dry) 
  6. Cut the striped piece of patterned paper from the Journal Sheet and trim slightly smaller than the card front. 
  7. Cut yellow cardstock to fit the front of a A2 Card. 
  8. Glue down cardstock 
  9. Glue Doily to striped sheet of patterned paper 
  10. Use a corner round on both the card and the patterned paper 
  11. Glue Patterned paper to card and using a white gel pen add stitching lines 
  12. Tie Ribbon around the top of the card 
  13. Pop dot the jar off of the centre of the doily.

Friday, August 17, 2012

Published Gift Set & Banner - February 2012 Cricut Magazine

I Recently had a cute little Ladybug Gift Set published in the February 2012 Cricut Magazine on Pg 44&45.  It is a cute little card with Matching Giftbag that is perfect for any valentines gift! 

I Titled it "Love Bug"

Picture of the matching set

Treat container

Card

I also had this cute Banner Published in the same magazine! 

 XO XO Banner

Close Up

Love Bug – Lady Bug Card
Create a Critter Cricut Cartrige, Pg 62

Patterned Paper:  My Mind’s Eye – Be Loved (Smitten Stripes), Ribbon:  PTI – True Black Party Plaid, Ink:  Papertrey Ink True Black, Cardstock:  Bazzill (white, black, yellow), Sentiment:  Stamping Bella, Button:  PTI Pure Poppy, Yellow Twine:  Stash
  1. Cut 2 shift Hedgehog Lady bugs  in White Cardstock at 3”, trim off the antenee
  2. Cut 1 shift Hedgehog Lady bug in the Black Cardstock, trim off the antenee
  3. Cut 1 shift Layer 2 in black cardstock
  4. Cut 1 shift Layer 3 in yellow cardstock
  5. Cut 1 shift Layer 1 in PP-My Minds Eye – Be Loved (Red Hearts) and Stamp Sentiment in Black Ink
  6. Score ½” of the back white lady bug at the top and glue the top of the scored piece to the front white        ladybug
  7. Glue the Black lady bug to the white ladybug base card.
  8. glue pp layer to black lady bug
  9. Blue yellow layer to black lady bug head
  10. Add bow to head
  11. Pop dot head on bug

Love Bug – Lady Bug Treat Box
Create a Critter Cricut Cartrige, Pg 62

Same supplies as above & Black and White Ribbon:  May Arts
  1. Do the same as above but cut at 3 ¾” and only cut one white Lady bug
  2. Cut a 9 x 8 piece of black cardstock
  3. Score at 3” on all 4 sides of the black cardstock
  4. Along both of the 9” sides cut to the centre point of the squares on both sides
  5. Fold all the score sides in and glue to make a box
  6. Cut a strip of black cardstock 1 ½” x 12” long and glue inside the box to create a handle
  7. Glue Lady Bug to the box


XO Banner
Cricut Cartridge: Birthday Bash (Triangle Banner Pieces) Pg 62
Cricut Cartridge:  Accent Essentials (Lopsided Heart under XO) Pg 67
Cricut Cartridge:  Stamping Solutions (XO)
Patterned Paper:  My Mind’s Eye – Be Loved
  • Triangle Banner is from the Red and Pink Polka Dot (Dearest Dots)
  • Scallop Triangle Banner Green Stripe (Lovely Loops)
  • Heart Punched Shapes – Red Hearts & Striped pp (Smitten Stripes)
  • Squizly Green Stripes  Heart shapes (Fond Flowers)
  • Flowers from the Fond Flowers PP  
  1. Cut 4 of the Triangle Banner using the Font, Material Saver and Quanity Buttons from the Red and pink polka dot pp at 4 3/4”
  2. Cut 4 of the shift Triangle Banner using the Font, Marerial Saver and Quantity Buttons Green Striped pp at the same height
  3. Using an Ek Success Heart Punches cut 2 Large and one Small Hearts and Ink on the the larger hearts on the Red side of the Heart pp with red ink
  4. Fold one large and one small heart in half and glue centre of the Red Large heart to the Large Striped Heart, then do the same with the small striped heart.
  5. Do this again to create 2 3-D Shaped Hearts and glue each heart to a banner piece.
  6. Cut 2 Hearts from Green Squiggly Stripe pp using the shift key and the Accent Essentails heart shape found on Pg 67 at 2 ¾”
  7. Cut 2 XOX0 from the Stamping Solutions Cartridge at 1 ¾” high and trim off the 2nd XO and discard on each cut
  8. Glue the 2 Green hearts to each remaining banner
  9. Pop dot the xo on top of each heart
  10. Cut out 2of the Circle flowers and 2 of the flowers from the centre and pop dot the 2nd flower on the circle flower and glue to inside of the 0.
  11. Add some blue bling to the centre of the flowers.

Tuesday, August 14, 2012

Published Card - January 2012 Cricut Magazine

Here is cute little "Winter Hat" card that I recently had published in the January 2012 Cricut Magazine, Page 41!

I titled it "Baby it's cold outside"


Details:  Patterned Paper:  Echo Park (Everybody Loves Christmas), Cardstock:  Bazzill Bling, Ribbon:  HAKidd (pink), Stamps:  PTI (Snowfall), Ink:  PTI True Black & Hawaian Shores, Glitter:  Crafts From Dollarama (blue), Cricut Expression, Cricut Cartridge:  Simply Charmed (Hat on pg 65), Corner Rounder, 

1)  Using the Simply Charmed Cricut cartridge cut 2 white hat’s  at 3 ¾” from Page 65 using the Shadow feature and the shift button.
2)  Cut another at the same size from the Echo Park (Everybody Loves Christmas -Scallop Stripes) Patterned paper. (snowflake patterned paper)
3)  Cut one more at the same size from the Echo Park (Everybody Love Christmas – Journalling Cards) Patterned Paper. (blue patterned paper)
4)   Cut the Layer 2 using the shift key from Blue Cardstock discarding the cuff cut and keeping the pop pom for the top.
5)  Using the Xyron sticker maker run the blue circle cut through the xyron and apply the blue glitter on the sticky side.
6)Trim the hat cut from the blue patterned paper saving only the cuff portion of the hat.
7) Stamp the sentiment on White Cardstock and trim to the size of the sentiment, round the corners and ink the edges in blue ink.
8)  Attach the sentiment to the blue cuff portion
9) Score the back cut of the white hat at approx 1” from the top of the hat.
10)  Glue the scored top portion to the top cut of the white hat.
11) Glue the Snowflake hat on top of the white card base.
12)  Pop Dot the Glittered Circle (pom pom) on the top of the hat.
13)  Pop Dot the Cuff on the base of the hat and apply white mini pom pom trim
14)  Tie a bow from the pink Ribbon and attach under the top of the hat using a glue dot.

Saturday, August 11, 2012

Knifty Knitter Flower Loom Tutorial

Today I will show you how to use the Kifty Knitter Flower Loom by Provocraft!  I have tried to get my hands on one of these very cool tools for quite a while now and when I was in at Two Scrapbook Friends recently I had asked Carolyn if she could get one in!  Well let me tell you... I am in love with what it can do with it!!! There are all kinds of mediums which you can use in this... today I am showcasing just a few of them... I have used some Jute, some Fabric, and some Tulle!  But I am sure Ribbon and twine would also look really cool!

Here is what the Tool looks like!

I also found this really great tutorial online By Erin Bassett on how to use use it!


So here I made the flower with some Jute Rope  I used a My Favorite Things Die to cut the brown flower out of some Felt and added a Wooden Button from my stash!

Here I decided to use some Fabric which I cut into stripes and ironed over so that you could see the fabric on both sides...  I used a Sizzix circle die to cut some yellow felt and use a needle and some floss to sew it in place!


Since these had turned out so well... I decided to try a little Tulle... and then could not resist creating this little 3D High Heeled Shoe with the Princess Party Cricut Cartridge!  I added a button and a little sparkle to the centre!


To get the fluffy look with the tulle I went around the loom two times and then once it was removed I cut in between each loop and trimmed it down a little with a pair of scissors. 

I hope you enjoyed the tutorial!


Wednesday, August 8, 2012

Under the Cuba Sun Layout

Here is another layout from when we were in Cuba!  Also created with the Echo Park paradise Beach line!


Under the Cuba Sun Layout 
  
Items Used: Echo Park Paradise Stickers & Pattered Paper Letter Stickers: American Crafts & Authentique, Twine, Button, Spray Glue, Glitter, My Favorite Things 1/4 “ Rosette Die, Fiskars Edger Punches, Split Punch (Stampin Up). 


1. Cut the mats and use the Fiskars Edger Punches on them. 
2. Cut the rosette from the Yellow Patterned Paper and put together. 
3. Tie Twine around the one photo mat 
4. Cut a scallop strip with the split punch 
5. Create Title with the different letter stickers. 
6. Apply Spray glue to button and sprinkle with Glitter 
7. Add Journaling and Stickers From Sticker Element Sheet.

Tuesday, August 7, 2012

Surf Shaped Card

Here is another Card I made with a pattern I found from the PaperCrafts Website as a download.  I traced it in my Silhouette Software and then created a cut shape that could be used on my silhouette!  I am totally in love with this card!   Here is the original  Surf Board Card Pattern  


Surf Card  


Items Used: Echo Park – Paradise Beach Patterned Paper & Element Sticker Sheet – PDF found on Papercrafts Website, Silhouette, Signo Uni-ball white pen, button, Glitter, Spray Glue,Glitter, Seambinding Ribbon, Red Twine (American Crafts). 


1. Import the PDF into the Silhouette Software and Trace it – delete the original before cutting the pieces. 
2. Using the White Signo Uniball Pen make stitching marks on appropriate cut pieces. 
3. Tie Ribbon around base of card and tie it into a bow. 
4. Spray button with Spray glue and sprinkle on glitter. Tie the Twine through the button and glue to the centre of the bow. 
5. Add the Flower Sticker and the Surf Stickers to the card.

Monday, August 6, 2012

3D Popsicle Box

Here is another Item I made with the Echo Park Paradise Beach Line


3D – Popsicle 

Items Used: Echo Park Paradise Pattered Paper (Red/Orange), Silhouette, Silhouette Popsicle Cut, Cricut, Mothers Day Bouquet Cricut Cartridge, Beige Bazzill cardstock, Kaiser craft Bling, Glossy Accents & Glamour Dust Glitter, Sentiment Stamp: Paper Smooches, Recollections Tear Drops (clear), red copic marker 


1. Cut the popsicle file on the silhouette and put together following the instructions. 
2. Cut the flower and the leaf at 1” on the cricut and glitter the leaf using the glossy accents. 
3. Put flower together and put bling in the centre of the flower. 
4. Tie some orange tulle into a bow and place the flower in the centre of the bow. 
5. Stamp sentiment in Brown Ink.  
6. And glue the sentiment and the flower and bow to the popsicle. 
7. Colour some clear tear drops using a red copic marker and glue down with glossy accents to make them look like drips.

Sunday, August 5, 2012

Cuba is Paradise Altered Picture Frame

Sorry... I have been a bad blogger lately.... but I have really been enjoying the Summer with my Family this year which was really important to me this year! Anyhow... I made this picture frame a while ago for Two Scrapbook Friends using the Echo Park Paradise Beach Line... the photo is one that we took when we were in Cuba in January!


I cut the word Paradise from Vinyl on my Silhouette and added it to the top of the glass for a little dimension in the Title!


3D – Cuba is Paradise Picture Frame 
Items Used: Echo Park – Paradise (Green/Teal, Surf & Sun) & Element Stickers, Circuit, Silhouette Cameo, Silhouette cuts: Paradise, Silhouette Brown Vinyl, My Favorite Things Dies (Sun, Flat bottom Clouds), Letter Stickers: Kaisercraft & Sassafrass, Button & Twine: PTI 

1. Cut the word paradise from the brown vinyl on the Silhouette Cameo at 3.75” long 

2. Cut the Journal Tag Our Summer Vacation; trim out the title part and pop dot it. 
3. Make another banner from brown patterned paper and put the title in the winter using letter stickers. 
4. Make a banner from the green patterned paper and add the title Cuba is with letter stickers. 
5. Trim away the suitcase and car on the journal tag and slip the photo inside. 
6. Cut a piece of the blue patterned paper to fit the frame. 
7. Add the journal tag with photo attached. Then add the Cuba banner and flower from the sticker sheet. 
8. Cut the sun and clouds from patterned paper and glue to frame, add a glittered button to the center of the sun that has some twine wrapped through the button. 
9. Apply the Vinyl cut to the outside of the frame. 
10. Add the rest of the stickers from the Sticker Element Sheet and the date to the bucket with the letter stickers.