Wednesday, June 27, 2012

Tiki Hut Drinks Layout

One of the things that the kids and the adults enjoyed when we were in Cuba was drinks from the Tiki Hut!  I could not resist making a layout with some of the pic's we had of everyone sipping their drinks!  And how best to display than but under a Straw Tiki Hut that I created with my Martha Stewart Fringe Scissors!

I could not resist using some of the stickers from the paper line! 


And I made this cute little tropical drink with my Cricut!


Layout – Tiki Hut Drinks 


Items Used: Echo Park Paradise Stickers & Pattered Paper (Splash, Green/Teal, Ride the Wave,On the Shore, Tropical), kraft cardstock, Cricut, Pack your bags Cricut Cartridge. Letter Stickers: American Crafts & Sassafrass. 

  1. The Tiki Hut was made with my Martha Stewart Fringe Siscors
  2. The Drink is made from the cricut cartridge and cut at 4 ½” 
  3. I cut the sun sticker in half and placed it behind the tiki hut 
  4. I added some stickles to the lemon and the leaf on the drink. 
  5. All the stickers are taken from the Sticker element sheet on the Paradise Echo Park Line.

Tuesday, June 26, 2012

3D Tropical Pineapple Drink

It's happy Hour Somewhere!  


I used a Tea Pot Cut from the Silhouette Store on my Cameo but modified it to not have a spout or handle when I created this Tropical Drink with Echo Park Paradise Beach!  I also used a Paper Smooches Stamp Set for the Sentiment!  The Drink Umbrella is also a Silhouette cut and I used my Cricut to create the Pineapple Leaves!


3D – Pineapple Drink 


Items Used: Echo Park Paradise Stickers & Pattered Paper (Flip flops, Tropical, BrowniCream), Bo Bunny Green, Silhouette, Silhouette Tea Pot Cut & Drink Umbrella Cut , Cricut and Preserves Cricut Cartridge, Sentiment Stamp: Paper Smooches, Twine (American Crafts), Button (PTI). 

  1. Cut 2 of the teapot sides without the handle a top and bottom of the teapot from both brown cardstock and the yellow patterned paper. 
  2. You will need to cut apart the yellow pieces and trim a small portion from each side the pieces then ink edges with Brown ink and glue to the centre pieces of the brown cardstock cuts. 
  3. Cut the Drink Umbrella at 3” from Pink Patterned paper. 
  4. Stamp sentiment in brown ink on a strip of cream patterned paper and cut into a banner shape. 
  5. Make button glittery with some spray adhesive and Glamour Dust. 
  6. Tie twine through button and into a bow. 
  7. Add sticker and button to the sentiment strip. 
  8. Pineapple green top is made on the cricut and cut 3 times at 3” Pineapple is found on pg 45 of the Preserves Cricut cartridge. 
  9. Glue together in a circle in layers, 
  10. Glue onto the top of the pineapple.

Saturday, June 16, 2012

Hello Sunshine Card

Here is one of the Cards that I decided to make from one of the journal cuts from the Echo Park  Paradise Beach line.


I cut these cute little Flip Flops with the Life is a Beach Cricut Cartridge and used a little flower punch to create the added flower!  I also used a White Gel pen to create the stitched lines on the outside of the card.


Card – Hello Sunshine 
Items Used: Echo Park – Paradise (Green/Teal, Surf & Sun, Cabana stripe), Cricut, Life is a Beach Cricut Cartridge (Flip flops), Small flower Punch, PTI Sentiment, Ink: Dark Chocolate, American Crafts Twine (Brown, Notch punch, Recollections resin flower, Fiskars notch punch, Glossy Accents and glitter. 

  1. Cut a piece of the green Green patterned paper to fit the front of an A2 Card. 
  2. Cut out the Flower Journal block from the Surf & Sun Patterned paper. 
  3. Using the Fiskars Edge-Notch punch to punch the top of the journal block 
  4. Stamp sentiment 
  5. Tie a piece of orange ribbon around the top and tie it in a bow. 
  6. Tie a piece of brown twine around the centre of the bow and tie another bow. In the centre of the twine bow apply a resin flower 
  7. Cut the Flip flops from the striped Patterned paper using the Life I a Beach Cricut  Cartridge. The sandles should be cut at 2” and you will need to cut the layer as well. 
  8. Glue sandle pieces together and make a double layered flower using the flower punch. Add some glitter to flower cuts and in the centre attach a pearl. 
  9. Pop dot the flip flops off the card. 
  10. Using a White Gel pen making stitching marks around the edge of the card.

Friday, June 15, 2012

3D Flip Flop Box

One of the first things I usually think of when it comes to what to make with Scrapbook Paper is 3D items... Right off the bat I knew I had to use some of this Echo Park Paradise Beach line to make one of these little Flip Flop Boxes!  The free SVG file found at My Graffico.


I immediately also had to add a little feminine Touch by adding a flower and leaves that I cut on my Cricut using the Mother's Day Bouquet Cricut Cartridge.  Before I put the Flower Pieces together I added some Glossy accents some some Glamour Dust Glitter.  I also could not resist adding some orange tulle to the mix as well...


I finished it off with a sentiment from Papertrey Ink!


3D – Flip Flop Box
Items Used: Echo Park Paradise Stickers & Pattered Paper (Cabana Stripe, Green/Teal, Red/Orange, Sunshine), Flip Flop SVG File from My Graffico, Cricut, Mothers Day Bouquet Cricut Cartridge, Kaisercraft Orange Pearls, Sentiment Stamp: PTI, glossy Accents and Glamour Dust Glitter. 

  1. Cut the SVG File and follow the instructions to put it together. 
  2. Make Flowers and leafs with Cricut and the Mother’s Day Bouquet Cricut cartridge the leaves are cut at 1” and the flowers are cut at 1 ½” and 1”. 
  3. Ink the edges of the flower s and leaves and then apply glossy accents and glitter to them. Let dry. 
  4. Then put flower pieces together using pop dots between them. And add to the centre of the straps on the flip flop.
  5. Stamp sentiment in brown ink and add under the flower.

Wednesday, June 13, 2012

Layout - Riding Waves in Cuba!

While we were in Cuba one of the things I just had to do was Swim with the Dolphins!  So my Brother, Sister-in-law and I decided to take a boat out into the middle of the ocean to a Dolphin Sanctuary where we could get into water with them - I have to say... I was a little scared once it came to time to get into the water but this was such a cool thing to do!  Here I used some Echo Park - Paradise Beach to create a layout to remember this very special moment of our Trip to Cuba! 


Since it was a Sunny Day when went I included the Sun Sticker from the Sticker Element Sheet and wanted it to shine and sparkle a bit so I took some orange buttons and spray glued them then added a little Glamour Dust Glitter to them before attaching them to the centre of the Sun!


I also found this cute little Dolphin Cut and Echo Park Wave in the Silhouette Store and cut them from some of the patterned paper in the same Echo Park Paradise Beach line.  Of course I could not resist adding a little sparkle to this little guy so used some stickles on him.


I decided to use 3 different letter stickers to create the title and could not resist adding the waves and starfish stickers from the Sticker Sheet.


Layout – Riding Waves with my friends in Cuba 
Items used: Echo Park - Paradise Patterned Paper (Paradise, Ride the Wave, Green/Teal), Silhouette Cameo, Silhouette Cuts: Bottled Nosed Dolphin, Echo Park Wave, Stickers: Echo Park paradise Element Stickers – Wave, Bling: Kaisercraft Black Rhinestone, Letter Stickers: Thickers (Teal & Orange), Lillybee (Brown), Spray adhesive, glitter, Glitter Glue. 
  1. On the Silhouette cut the Echo Park Wave from the patterned paper at 3.965” high 
  2. On the Silhouette cut the Bottle Nosed Dolphin at 3.680” high from the 2 patterned papers and ink the edges of all the pieces before gluing them together. You can use a Kaisercraft Black Rhinestone for the eye on the dolphin 
  3. Glue down the splash and the photo then use pop dots to give the dolphin a little dimension. 
  4. Add the waves from the sticker sheet and then place down the letters for the title. 
  5. Then Add the Starfish and ball from the Sticker Element Sheet. 
  6. Cut out the sun from patterned paper and pop dot it off the page. 
  7. Using spray glue – spray some buttons with glue and apply some glitter, let dry and add them to the centre of the sun. 
  8. Add some stickles to the lower body of the dolphin.

Sunday, June 10, 2012

3D Hot Air Balloon - Echo Park "Sweet Day"

I was recently provided with a Guest Design Team Kit from Two Scrapbook Friends which included some patterned paper from the Echo Park Sweet Day Collection!  And I thought it would be perfect to use with this  SVG file of a Hot Air Balloon I found from SVG Attic.  


I used some Vellum in the centre of the basket portion of the basket part of the Balloon!  I also hand cut some of the smaller clouds from a 6x6 pad of the Echo Park Sweet Day paper.


It needed a little sparkle so I used some Spray Glue on a yellow button and added some glitter to it.  I tied the tag that I created to the balloon basket with some Blue Seam binding Ribbon and then added the button that had some twine tied through it!

3D Hot Air Balloon
Supplies: Echo Park Sweet Day Stickers & Pattered Paper, Bo Bunny – Double Dot Coffee Journal, Silhouette, Spring Fling SVG File from SVG Attic. Button, Spray Glue, Glitter, Seambinding Ribbon, Twine – American Crafrs. 
  1. Cut the appropriate pieces from the patterned papers and glue together following the instructions provided with the SVG Kit. 
  2. I used Vellum instead of cardstock for the window parts of the balloon Basket. 
  3. Cut some clouds from the patterned paper and put on the round base. 
  4. Apply the cloud sticker to the round base. 
  5. Make a tag from a piece of brown patterned paper. Apply the sentiment sticker. Tie the tag onto the Hot Air Balloon with the ribbon and tie it into a bow. 
  6. Apply the Spray Glue to the button and add the glitter. 
  7. Tie the Twine through the button and attach to the center of the bow.

Thursday, June 7, 2012

Father's Day Blog Hop!


Welcome to the Two Scrapbook Friends Father's Day Blog Hop! You should have started the hop at the Two Scrapbook Friends Blog and arrived here from ------'s blog. If you comment on each blog, you will qualify to be in a draw for a special prize from Two Scrapbook Friends! Also, you will find a RED HIGHLIGHTED word on each blog which will make a phrase at the end of the Blog Hop! Once you have completed the hop to all our designers blogs, please leave a comment on the Two Scrapbook Friends blog. Then be sure to email the completed phrase to them for a second chance to win! So remember, in order to be entered to win:1. Leave a comment on all the blogs as you go and then come back to the Two Scrapbook Friends blog and leave a final comment there.2. To have a second chance to win, keep track of the HIGHLIGHTED WORDS from each blog and email the phrase to 2friends@execulink.com. Put "Blog Contest" in your subject line.3. Check back at the Two Scrapbook Friends blog on June 12th to see if you are the winner. (Winners will not be contacted personally.) Here is the list of blogs you will visit on this inspiring journey:
Joanne

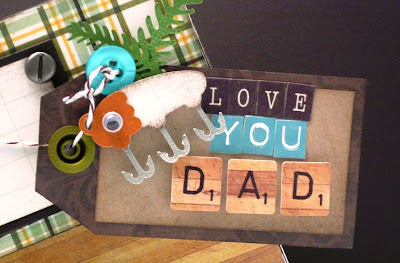
For my project... I decided to create a Fishing Vest & Tackle Box using some SVG Files that I found from SVGCUTS and a sample by one of their designers on the blog Tamara Tripodi.  Here are some pictures of my project as well as details on how they were made!


Is this luggage handle not adorable!


Close up Tag


I am planning on putting some Canned Peanuts and Chocolate Covered Almonds inside the tackle box for my FATHER as these are his favorite treats!

I hope you enjoy the rest of  the Hop!  Your next stop in the Blog Hop is  Jayne


Fathers’s  Day Vest Card
Supplies:  Patterned Paper & Sticker - Echo Park (This & That: Charming), SVG Vest Card (SVG Cuts),  Cuttlebug & Diamond Plate Embossing Folder Sentiment:  PTI (Father Know’s Best), PTI Dark Chocolate Ink, Banner Die:  PTI, Eyelets (Making Memories), Twine:  American Crafts.  Silhouette Cameo,  Sure Cuts A Lot, Embroidery Floss.
  1. Cut  the vest card base & Pockets using the Silhouette Cameo and Sure Cuts A Lot Software.   This is a Free SVG File found at SVG Cuts – Free Vest Card 
  2. Using the Embossing Folder emboss the front flaps of the vest card.
  3. Ink the edges of the card with Brown ink.
  4. Sew the details of the pockets with Beige Embroidery Floss.
  5. Glue all pocket pieces to the card.
  6. Punch and set 2 eyelets and close the card with brown twine.
  7. Cut banner strip with cuttlebug and stamp sentiment.
  8. Apply star sticker.

Tackle Box
Supplies Used:  Echo Park (This & That:  Charming), Silhouette Cameo, Sure Cuts A Lot, SVG Cuts:  Ryan’s Playdate SVG Kit (Playfull Box)Forest Country SVG Collection,

  1. Cut the  Playfull Box from the Ryan’s Playdate SVG Kit from from SVG Cuts. From the Patterned Paper and assemble (I inked the edges of all the pieces with Brown Ink before putting the pieces together.   Use the Brads to put the handle on the box.
  2. Cut the Embelishment pieces from the Forest country SVG Collection.  Ink the edges and glue to the tackle box.
  3. Place Treats or gift inside the box.

Tuesday, June 5, 2012

3D Cupcake!

Well I know I am a little behind in my bloging lately so I decided that I would post some past DT items for Two Scrapbook Friends that I have not yet posted on my blog!  Here is a cute little 3D Cupcake I made using my Cricut and the Tags Bags Boxes and More 2 Cartridge! 


Happy Birthday Cupcake

Items Used:  Cricut Expression, Cricut Craftroom,  Cartridge:  Tags, Bags Boxes and More 2 (Cupcake Box), Mothers Day Bouquet – Digital (Flowers & Leaves), Patterned Paper:  My Minds Eye – Miss Caroline “Dolled Up”, Bling:  Dolarama, Stamp, Die, Ink: PTI (or My Favorite Things), Stamp & Ink:  PTI; Trim:  Maya Road (Pink), Mist:  Glimmer Mist – Olive Vine, Doily & Twine:  Craft Supply.